# ownload the code
/project$ git clone https://github.com/big-data-europe/docker-spark.git

Cloning into 'docker-spark'...
remote: Enumerating objects: 1951, done.
remote: Counting objects: 100% (631/631), done.
remote: Compressing objects: 100% (159/159), done.
remote: Total 1951 (delta 543), reused 501 (delta 472), pack-reused 1320 (from 1)
Receiving objects: 100% (1951/1951), 7.97 MiB | 50.07 MiB/s, done.
Resolving deltas: 100% (1038/1038), done.

# Change directories
/home/project$ cd docker-spark

/home/project/docker-spark$

# Start the Cluster
/home/project/docker-spark$ docker-compose up

.....
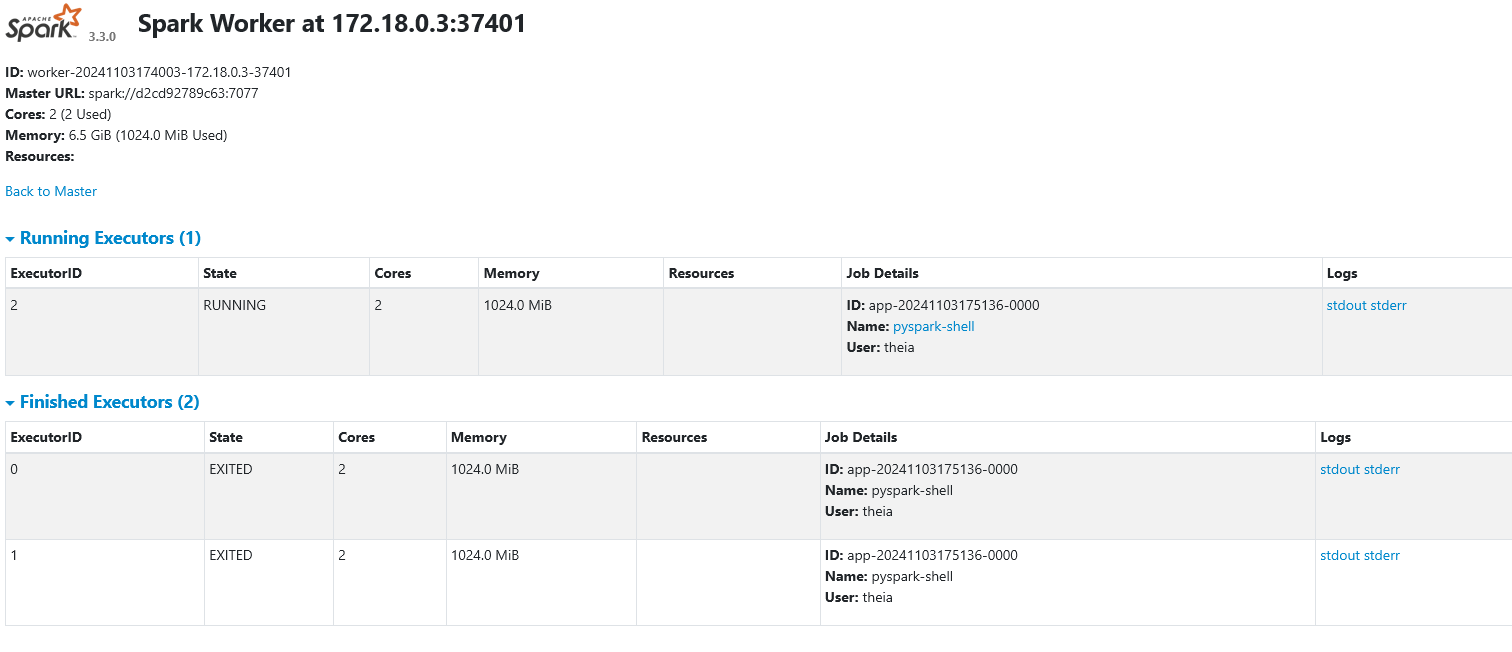
spark-worker-1  | 24/11/03 17:40:03 INFO Utils: Successfully started service 'sparkWorker' on port 37401.
spark-worker-1  | 24/11/03 17:40:03 INFO Worker: Worker decommissioning not enabled.
spark-master    | 24/11/03 17:40:03 INFO Utils: Successfully started service 'sparkMaster' on port 7077.
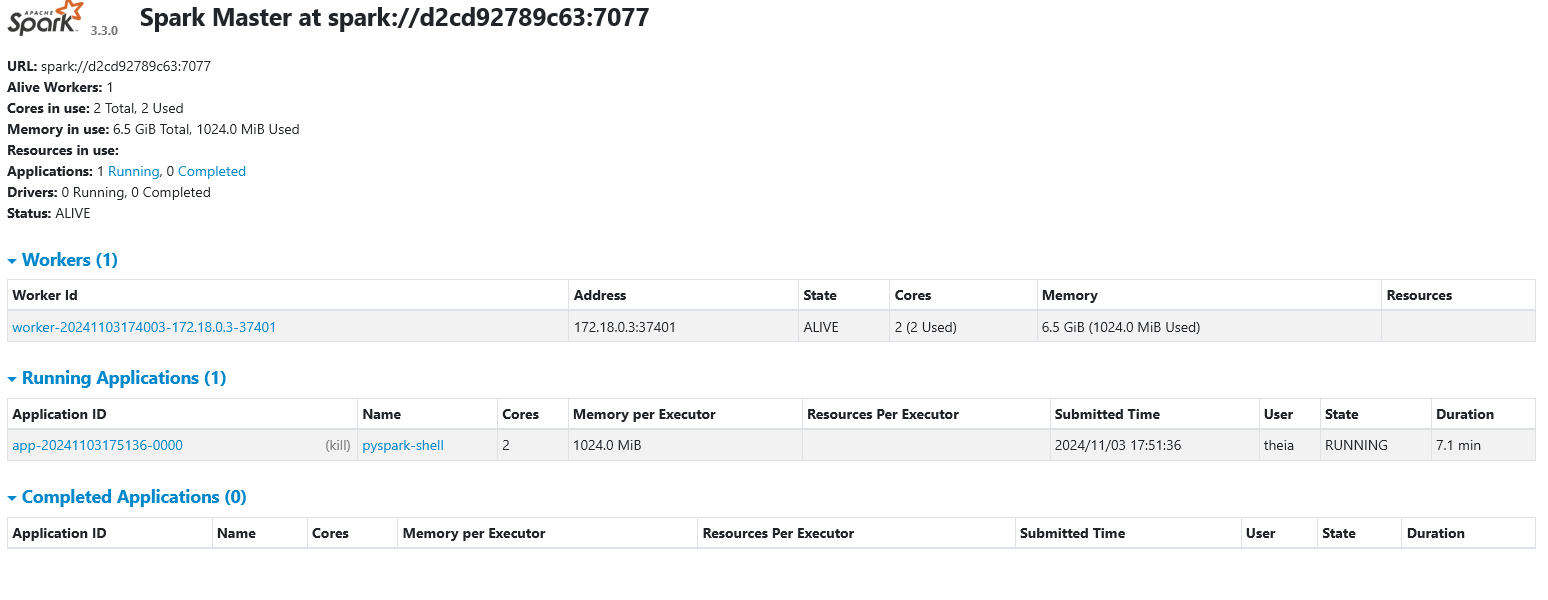
spark-master    | 24/11/03 17:40:03 INFO Master: Starting Spark master at spark://d2cd92789c63:7077
spark-master    | 24/11/03 17:40:03 INFO Master: Running Spark version 3.3.0
spark-worker-1  | 24/11/03 17:40:03 INFO Worker: Starting Spark worker 172.18.0.3:37401 with 2 cores, 6.5 GiB RAM
spark-worker-1  | 24/11/03 17:40:03 INFO Worker: Running Spark version 3.3.0
spark-worker-1  | 24/11/03 17:40:03 INFO Worker: Spark home: /spark
...

spark-master    | 24/11/03 17:40:04 INFO Master: Registering worker 172.18.0.3:37401 with 2 cores, 6.5 GiB RAM
spark-worker-1 | 24/11/03 17:40:04 INFO Worker: Successfully registered with master spark://d2cd92789c63:7077Create Code
Spark on Docker
Objectives
We will use a cloud IDE setup on IBM Lab since this is what I’m using at the time. Other IDEs will be similar
In this document we will:
- Install a Spark Master and Worker using Docker Compose
- Create a python script containing a spark job
- Submit the job to the cluster directly from python
Pre-requisites:
- A working docker installation
- Docker Compose
- The git command line tool
- A python development environment
Install Docker-Spark
Install Spark Cluster using Docker Compose
- New Terminal
- Get the code
docker-spark.git - Change directory to the downloaded code
Start Cluster
- Start the cluster
docker-compose up
- Open a new terminal
- Create a new python file with
touch submit.py
# Create a new python file
:/home/project$touch submit.py

# Save this code in the file
import findspark
findspark.init()
from pyspark import SparkContext, SparkConf
from pyspark.sql import SparkSession
from pyspark.sql.types import StructField, StructType, IntegerType, StringType

sc = SparkContext.getOrCreate(SparkConf().setMaster('spark://localhost:7077'))
sc.setLogLevel("INFO")

spark = SparkSession.builder.getOrCreate()

spark = SparkSession.builder.getOrCreate()
df = spark.createDataFrame(
    [
        (1, "foo"),
        (2, "bar"),
    ],
    StructType(
        [
            StructField("id", IntegerType(), False),
            StructField("txt", StringType(), False),
        ]
    ),
)
print(df.dtypes)
df.show()
Execute Code
In the event this has not been done, you can skip this section if already satisfied
Upgrade Pip
rm -r ~/.cache/pip/selfcheck/
pip3 install --upgrade pip
pip install --upgrade distro-info
Download Spark
wget https://archive.apache.org/dist/spark/spark-3.3.3/spark-3.3.3-bin-hadoop3.tgz && tar xf spark-3.3.3-bin-hadoop3.tgz && rm -rf spark-3.3.3-bin-hadoop3.tgzSet Environment Variables
- Set JAVA_HOME
- Set SPARK_HOME
export JAVA_HOME=/usr/lib/jvm/java-1.11.0-openjdk-amd64
export SPARK_HOME=/home/project/spark-3.3.3-bin-hadoop3
Install PySpark
pip install pysparkInstall Findspark
python3 -m pip install findsparkExecute Code
python3 submit.pySpark Master
Launch your Spark Master which can be found at port 8080

Spark Worker
Click the button below to open the Spark Worker on 8081. Alternatively, click on the Skills Network button on the left, it will open the “Skills Network Toolbox”. Then click the Other, then Launch Application. From there, you should be able to enter the port number as 8081 and launch.
