C:\Users\EMHRC>java -version
java version "23.0.1" 2024-10-15
Java(TM) SE Runtime Environment (build 23.0.1+11-39)
Java HotSpot(TM) 64-Bit Server VM (build 23.0.1+11-39, mixed mode, sharing)Spark using Python
Spark is written in Scala, which compiles to Java bytecode, but you can write python code to communicate to the java virtual machine through a library called py4j. Python has the richest API, but it can be somewhat limiting if you need to use a method that is not available, or if you need to write a specialized piece of code. The latency associated with communicating back and forth to the JVM can sometimes cause the code to run slower. An exception to this is the SparkSQL library, which has an execution planning engine that precompiles the queries. Even with this optimization, there are cases where the code may run slower than the native scala version. The general recommendation for PySpark code is to use the “out of the box” methods available as much as possible and avoid overly frequent (iterative) calls to Spark methods. If you need to write high-performance or specialized code, try doing it in scala. But hey, we know Python rules, and the plotting libraries are way better. So, it’s up to you!
Install Spark Win 11
https://medium.com/@ansabiqbal/setting-up-apache-spark-pyspark-on-windows-11-machine-e16b7382624a
Install Java
- In my windows cmd terminal
- From: https://www.oracle.com/java/technologies/downloads/#jdk23-windows
- Check java
Check Python
Could not get it to work with current Python had to roll it back to 3.11.8
C:\Users\EMHRC>python3 --version
Python 3.11.8

# Could not get it to work with current Python had to roll it back to 3.11.8
Download Spark Tar
- From https://spark.apache.org/downloads.html
- Choose

- From next page choose: HTTP https://dlcdn.apache.org/spark/spark-3.5.3/spark-3.5.3-bin-hadoop3.tgz
Extract Spark
- Create an empty folder named Spark in C drive (your main drive)
Download Hadoop Winutils & hadoop.dll
- Download from this https://github.com/kontext-tech/winutils/blob/master/hadoop-3.3.0/bin/hadoop.dll
- Create folder in c:/Winutils/bin
- Place both files in the bin folder
Set Environment Variables
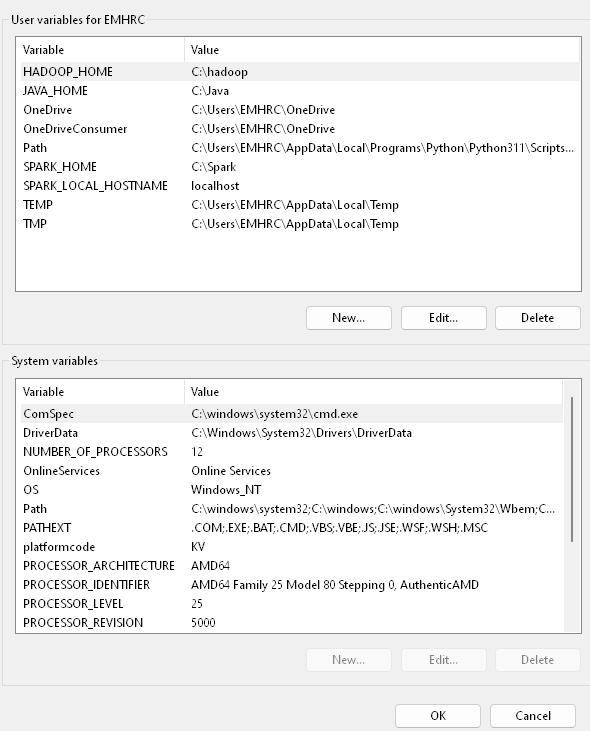
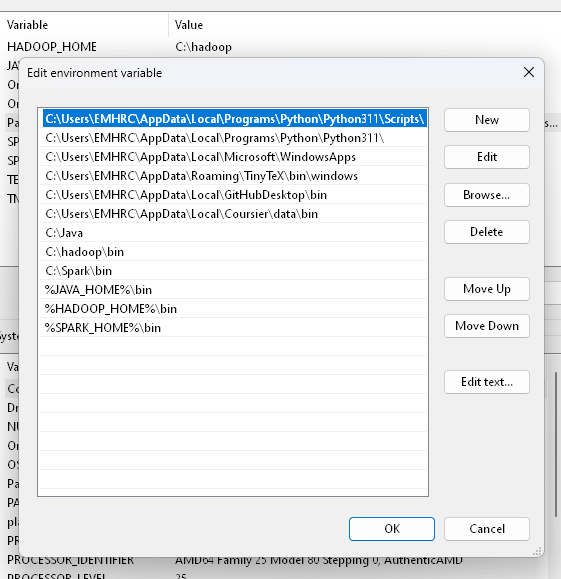
- Set env variables for Java, Hadoop, Spark
- Start menu > environmental variable
- JAVA_HOME = \wsl.localhost-openjdk-amd64
- “C:Files (x86).0_431”


Configuration
OPTIONAL - In the conf directory within your Spark installation, you’ll find various configuration files. The most important is spark-defaults.conf, where you can set Spark properties. However, for local development, the default configurations are often sufficient.
Start Spark Terminal
Interactive Shell (Scala or Python): You can start the interactive Spark shell using the following commands:
- Scala: Run
spark-shellin your terminal. - Python: Run
pysparkin your terminal.
Submit Application
Submitting applications: You can submit Spark applications in a similar way:
- Scala:
spark-submit --class <main-class> --master local <path-to-jar> - Python:
spark-submit --master local <path-to-python-script>
Write Spark App
Spark applications are typically written using the Spark APIs. You can use Resilient Distributed Datasets (RDDs) or DataFrames and data sets for more structured and optimized operations. See examples in the How To section
Monitoring
Spark provides a web-based interface (by default at http://localhost:4040) to monitor your Spark applications and their progress.
Stop
Make sure to stop the Spark session after done, therefore releasing resources spark.stop()
Now that I’ve shown how to use the terminal let’s write some code and save as Spark Application
Setup
Install Libraries
- I am using quarto for this document so I will install these packages first using the commands below
- It will load the packages in the virtual environment located at
"C:/~/EMHRC/OneDrive/Documents/.virtualenvs/r-reticulate......"
library(reticulate)
#py_install ("pyspark")
#py_install ("findspark")
Local Drive
- Using Windows cmd terminal I need to install these packages in python
- From C:\~\ use pip to install
pip install pysparkpip install findspark
Importing libraries
findsparkis used to locate the Spark installation.
import findspark  # This helps us find and use Apache Spark
findspark.init()  # Initialize findspark to locate Spark
# PySpark is the Spark API for Python. In this project, we use PySpark to initialize the spark context.
from pyspark import SparkContext, SparkConf
from pyspark.sql import SparkSessionInitiate Session
- Create Spark Context
- Initialize Spark Session
- SparkContext is the entry point for Spark applications and contains functions to create RDDS such as
parallelize() - SparkSession is needed for SparkSQL and DataFrame operations
Create Spark Session
# Creating a spark context class
sc = SparkContext()

# Creating a spark session
spark = SparkSession \
    .builder \
    .appName("Python Spark DataFrames basic example") \
    .config("spark.some.config.option", "some-value") \
    .getOrCreate()
# OUTPUT
 WARN util.NativeCodeLoader: Unable to load native-hadoop library for your platform... using builtin-java classes where applicable
Setting default log level to "WARN".
To adjust logging level use sc.setLogLevel(newLevel). For SparkR, use setLogLevel(newLevel).
24/10/29 23:11:35 WARN util.Utils: Service 'SparkUI' could not bind on port 4040. Attempting port 4041.
Verify Session
if 'spark' in locals() and isinstance(spark, SparkSession):
    print("SparkSession is active and ready to use.")
else:
    print("SparkSession is not active. Please create a SparkSession.")

# OUTPUT
SparkSession is active and ready to use.
RDDs
RDDs are Spark’s primitive data abstraction and we use concepts from functional programming to create and manipulate RDDs.
Create an RDD.
For demonstration purposes, we create an RDD here by calling sc.parallelize()
We create an RDD which has integers from 1 to 30.
data = range(1,30)
# print first element of iterator
print(data[0])
len(data)
xrangeRDD = sc.parallelize(data, 4)

# this will let us know that we created an RDD
xrangeRDD

# OUTPUT
1
PythonRDD[1] at RDD at PythonRDD.scala:53
Transformations
A transformation is an operation on an RDD that results in a new RDD. The transformed RDD is generated rapidly because the new RDD is lazily evaluated, which means that the calculation is not carried out when the new RDD is generated. The RDD will contain a series of transformations, or computation instructions, that will only be carried out when an action is called. In this transformation, we reduce each element in the RDD by 1. Note the use of the lambda function. We also then filter the RDD to only contain elements <10.
subRDD = xrangeRDD.map(lambda x: x-1)
filteredRDD = subRDD.filter(lambda x : x<10)
Actions
A transformation returns a result to the driver. We now apply the collect() action to get the output from the transformation.
print(filteredRDD.collect())
filteredRDD.count()

# OUTPUT
[0, 1, 2, 3, 4, 5, 6, 7, 8, 9]
10
Caching Data
This simple example shows how to create an RDD and cache it. Notice the 10x speed improvement! If you wish to see the actual computation time, browse to the Spark UI…it’s at host:4040. You’ll see that the second calculation took much less time!
import time

test = sc.parallelize(range(1,50000),4)
test.cache()

t1 = time.time()
# first count will trigger evaluation of count *and* cache
count1 = test.count()
dt1 = time.time() - t1
print("dt1: ", dt1)


t2 = time.time()
# second count operates on cached data only
count2 = test.count()
dt2 = time.time() - t2
print("dt2: ", dt2)

#test.count()

# OUTPUT
dt1:  0.9115233421325684
dt2:  0.26584434509277344
DataFrames & SparkSQL
In order to work with the extremely powerful SQL engine in Apache Spark, you will need a Spark Session. We have created that in the first Exercise, let us verify that spark session is still active.
spark

# OUTPUT
SparkSession - in-memory

SparkContext

Spark UI

Versionv2.4.3Masterlocal[*]AppNamepyspark-shell
Create DataFrame
You can create a structured data set (much like a database table) in Spark. Once you have done that, you can then use powerful SQL tools to query and join your dataframes.
Download Data
# Download the data first into a local `people.json` file
!curl https://cf-courses-data.s3.us.cloud-object-storage.appdomain.cloud/IBM-BD0225EN-SkillsNetwork/labs/data/people.json >> people.json

# OUTPUT
  % Total    % Received % Xferd  Average Speed   Time    Time     Time  Current
                                 Dload  Upload   Total   Spent    Left  Speed
100    73  100    73    0     0    776      0 --:--:-- --:--:-- --:--:--   784
Data to DF
# Read the dataset into a spark dataframe using the `read.json()` function
df = spark.read.json("people.json").cache()
Print DF
# Print the dataframe as well as the data schema
df.show()
df.printSchema()

# OUTPUT
+----+-------+
| age|   name|
+----+-------+
|null|Michael|
|  30|   Andy|
|  19| Justin|
+----+-------+

root
 |-- age: long (nullable = true)
 |-- name: string (nullable = true)
Register DF as SQL tempview
# Register the DataFrame as a SQL temporary view
df.createTempView("people")
Explore Data
View Columns
# Select and show basic data columns

df.select("name").show()
df.select(df["name"]).show()
spark.sql("SELECT name FROM people").show()

# OUTPUT
+-------+
|   name|
+-------+
|Michael|
|   Andy|
| Justin|
+-------+

+-------+
|   name|
+-------+
|Michael|
|   Andy|
| Justin|
+-------+

+-------+
|   name|
+-------+
|Michael|
|   Andy|
| Justin|
+-------+
Filter On Condition
# Perform basic filtering

df.filter(df["age"] > 21).show()
spark.sql("SELECT age, name FROM people WHERE age > 21").show()

# OUTPUT
+---+----+
|age|name|
+---+----+
| 30|Andy|
+---+----+

+---+----+
|age|name|
+---+----+
| 30|Andy|
+---+----+
Aggregate
# Perfom basic aggregation of data

df.groupBy("age").count().show()
spark.sql("SELECT age, COUNT(age) as count FROM people GROUP BY age").show()

# OUTPUT
+----+-----+
| age|count|
+----+-----+
|  19|    1|
|null|    1|
|  30|    1|
+----+-----+
RDD Queries
Create an RDD with integers from 1-50. Apply a transformation to multiply every number by 2, resulting in an RDD that contains the first 50 even numbers.
numbers = range(1, 50)
numbers_RDD = sc.parallelize(numbers)
even_numbers_RDD = numbers_RDD.map(lambda x: x * 2)
print( even_numbers_RDD.collect())
DF & SparkSQL
Similar to the people.json file, now read the people2.json file into the notebook, load it into a dataframe and apply SQL operations to determine the average age in our people2 file.
!curl https://cf-courses-data.s3.us.cloud-object-storage.appdomain.cloud/IBM-BD0225EN-SkillsNetwork/labs/people2.json >> people2.json
df = spark.read.json("people2.json").cache()
df.createTempView("people2")
result = spark.sql("SELECT AVG(age) from people2")
result.show()
Close Spark Session
spark.stop()Configuration

You can configure a Spark Application using three different methods:
- properties
- environment variables
- logging configuration
You can set Spark properties to adjust and control most application behaviors, including setting properties with the driver and sharing them with the cluster.
- Environment variables are loaded on each machine, so they can be adjusted on a per-machine basis if hardware or installed software differs between the cluster nodes.
- Spark logging is controlled by the log4j defaults file, which dictates what level of messages, such as info or errors, are logged to file or output to the driver during application execution.
- Spark configuration files are located under the “conf” directory in the installation. By default, there are no preexisting files after installation, however Spark provides a template for each configuration type
- You can create the appropriate file by removing the ‘.template’ extension.
- Inside the template files, are sample configurations for common settings.
- You can enable them by uncommenting.
How To Configure
You can configure Spark properties in a few different ways.
- In the driver program, you can set the configuration programmatically when creating the SparkSession or by using a separate SparkConf object that is then passed into the session constructor.
- Properties can be set in a configuration file found at ‘conf/spark-defaults.conf’
- Properties can also be set when launching the application with spark-submit, either by using provided options such as ‘–master’ or using the “–conf” option with a key, value pair.
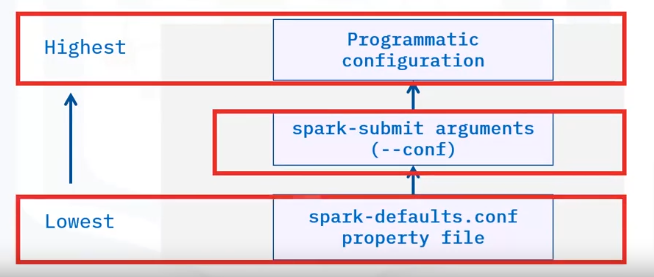
Property Precedence

- The configuration set programmatically takes the highest precedence. This means that if a configuration has already been set elsewhere or programmed into the application it will be overwritten.
- Next is the configuration provided with the spark-submit script.
- Last is any configuration set in the spark-defaults.conf file.
Static Configuration
Static configuration refers to settings that are written programmatically into the application itself. These settings are not usually changed because it requires modifying the application itself.
- Use static configuration for something that is unlikely to be changed or tweaked between application runs, such as application name or other properties related to the application only.
Dynamic Configuration
- Spark dynamic configuration is useful to avoid hardcoding specific values in the application itself.
- This is usually done for configuration such as the master location, so that the application can be launched on a cluster by simply changing the master location.
- Other examples include setting dynamically how many cores are used or how much memory is reserved by each executor so that they can be properly tuned for whatever cluster the application is run on.
Environment Vars
- Spark environment variables are loaded from the file ‘conf/spark-env.sh’.
- These are loaded from each machine in the cluster when a Spark process is started.
- Since these can be loaded differently for each machine, it can help configure specifics on a per-machine basis.
- A common usage is to ensure each machine in the cluster uses the same Python executable by setting the “PYSPARK_PYTHON” environment variable.
Spark Logging
- Spark logging is controlled using log4j and the configuration is read through ’conf/log4j-properties’.
- Here you can adjust a log level to determine which messages (such as debug, info or errors) are shown in the Spark logs
- Log4j allows the configuration to set where the logs are sent to and adjust specific components of Spark or third-party libraries.